The main function of this program is to provide access to the serial interface of a host computer, typically, but not necessarily an IBM-PC compatible. SerialApp has several functions to simplify the use of the serial interface. Among these are the possibility to load user files and to send these automatically through the serial interface to a hardware client and save received and edited data. It can also save the last configurations in the file config.cfg, and allows up to 4 independent terminals to enter and display specific data coming from the hardware serial interface, providing the possibility to separately interact with distinct pieces of hardware through a single serial interface.
The access to the serial interface can be configured with the following parameters: byte size, stop bits, baud rate, parity and COM port.
Click here to download the SerialApp
The required environment to run this program includes to have installed:
javax.comm API (Java Communication API) installation Tips:
If an example program opens, the installation has been completed successfully.
Executing the SerialApp:
The first time you execute the SerialApp you need to set the correct path of your Java folder in the serial.bat file. After that, you can execute the SerialApp by just executing the serial.bat file.
Keyboard shortcuts:
F1: call this help
CTRL + O: open a file in the transmitter window
CTRL + R: clear the receiver window
CTRL + T: clear the transmitter window
CTRL + C: connect the serial interface
CTRL + D: close the serial interface connection
CTRL + K: configure the parameters to access the serial interface
CTRL + S: send the text of the transmitter window through the serial interface
Terminal configurations:
SerialApp is prepared to receive input and output commands as "printf" and "scanf" from specified processing elements of the system running on a remote hardware, typically configured in an FPGA prototyping board. To do so, it is necessary to configure the file processor.cfg, that must be in the current user directory. Each line of processor.cfg file must have: the ADDRESS of the processing element that sends a message (an IP core) and a NAME for this IP core. The two parameters must be separated by a blank space. An example of processor.cfg file is showed bellow:
10 processor1
11 processor2
where 10 and 11 are the addresses of the IP cores and "processor1" and "processor2" are the names of the cores, respectively. This will create special windows to enter and display data from "processor1" and "processor2".
Therefore, when the prototyping board sends the stream data 55 55 55 55 10 03 88 99 as presented in Figure 1, the SerialApp identifies as a terminal event (55 55 55 55), for processor1 (10), printf event (03) with printf data 88 99. When the prototyping board sends the stream data 55 55 55 55 10 04 as presented in Figure 2, the processor1 terminal of the SerialApp waits 2 bytes represented in hexadecimal format from the user input.
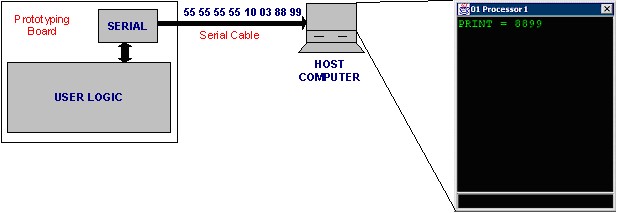
Figure 1 - Example of a printf command sent by the prototyping board to the SerialApp running in the host computer.
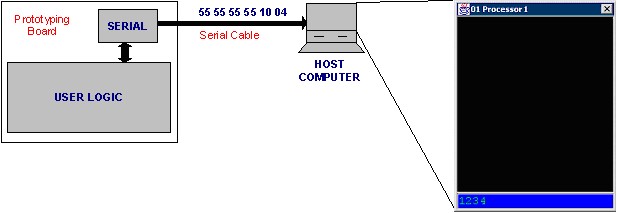
Figure 2 - Example of a scanf command sent by the prototyping board to the SerialApp running in the host computer.
E-mail: [email protected]